Dear friends,
Due to COVID-19, it is always safe to stay at home. So this blog will help you to open your NPS account (National Pension System) online.
It will really help you a lot.
NPS Tier 1 Tax Benefits


Due to COVID-19, it is always safe to stay at home. So this blog will help you to open your NPS account (National Pension System) online.
It will really help you a lot.
NPS Tier 1 Tax Benefits
You get a tax deduction under Section 80CCD(1) and 80CCD(2) on contributions to the NPS up to Rs 1.5 lakh per annum.
- In addition, you can get a tax deduction on contributions up to Rs 50,000 under Section 80CCD(1B). Hence the total tax benefit on contributions to the NPS is Rs 2 lakh per annum.
- In addition, the returns on NPS are tax-exempt while the money is retained in the NPS account.
- On maturity, up to 60% of the accumulated NPS corpus can be withdrawn free of tax. Another 40% must be used to buy an annuity (regular pension).

When I was trying to open an online NPS account, I faced some problems and the same is being shared here.
So we will see the procedure step by step:
Step-1:
Click on the following link to open the NPS account.
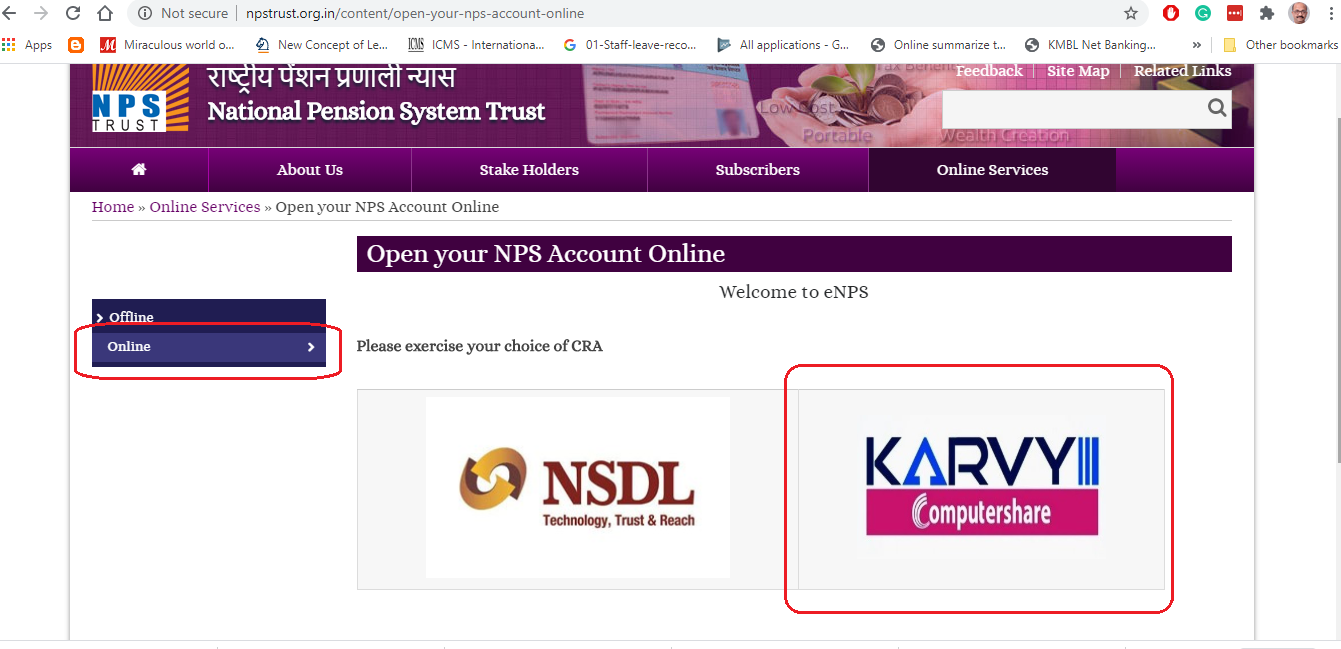
I used KARVY to register for NPS. You can choose anything.
Step-2:
Click on the Join NPS New User button.

Step-3:

If you select PAN, then the following task is being done.
NOTE: Please select the Point of Presence (POP) where you have an existing relationship – either a Savings/ Current account (in case of Bank) or any Demat/ Mutual Fund/ Insurance, etc. (in case of non-Bank). Your KYC verification under NPS will be done by the selected POP (Bank/ non-Bank). A one-time fee of up to a maximum of Rs. 125 (plus applicable taxes) will be charged by POP (Bank/ non-Bank) as KYC authentication charges.
Secondly, if you choose the AADHAR card, follow the following diagram.

Here you need to be ready for the following:

Step-4:
Now generate an XML file of your AADHAR card, which will be uploaded while registering for the NPS account.

Step-5:
Now upload the XML file on the system.

Step-6:
Now fill in all the steps as given below.


Step-7:
Now you can pay a minimum of Rs. 500 and after payment, you will get your PRAN
Step-8:
Kindly note that your KYC details will be sent to the Bank selected by you during the registration process for verification. Once Bank has confirmed the KYC verification, you can esign the registration form.
Step-9:
Now you can also download the NPS mobile app from Google Play Store for Android (http://bit.do/ewpU8) and Apple Play Store for iOS by searching "NPS by KFintech CRA".
In the same way, you can also register for the NPS account using the NSDL portal.

No comments:
Post a Comment